I want to be honest about where I started with this: I felt genuinely terrible the first time I closed that crate door with Ollie inside. He was eight weeks old, caramel-colored and impossibly small in his sage green bandana, and he looked at me through the wire with an expression that I can only describe as “profound personal betrayal.” The whimpering started within thirty seconds.
My walls in my mid-century modern New York apartment are not thick — I know this because I can hear my neighbor’s phone conversations with uncomfortable clarity — and the very real fear that Ollie’s crying would generate noise complaints, then an eviction notice, then homelessness, was not entirely irrational at 11 PM on a Tuesday.
The entire subject of crate training apartment dogs felt, in that moment, like a problem designed specifically to break me. What shifted everything was not a technique. It was a mindset change about what a crate actually is — and once that clicked, the rest followed faster than I expected.
The crate is not a cage. That reframing is not a feel-good platitude — it is a behaviorally accurate description of what a properly introduced crate represents to a dog. Den-seeking behavior is encoded in domestic dogs’ ancestral neurology.
Wild canids rest, birth, and seek safety in enclosed spaces. The crate, done right, becomes the one place in your apartment that is entirely your dog’s — predictable, safe, and associated exclusively with good things. Ollie now walks into his crate voluntarily and sleeps there with the door wide open. The journey between that first Tuesday night and where we are now is exactly what this post covers.
Quick Answer
Successful crate training apartment dogs requires patience, positive reinforcement, and neighbor-conscious noise management. Start by making the crate a high-value zone with meals and treats inside. Practice micro-absences starting at thirty seconds, never use the crate as punishment, cover it with a breathable blanket to simulate a dark den, and place a white noise machine nearby to muffle initial crying during the adjustment period.
The “Cage” Guilt (Changing Your Mindset)
The guilt you feel when you first close that crate door is coming from a human framework that does not apply to dogs. We look at a wire enclosure and see confinement. We project our own experience of what it would feel like to be locked in a small space, and the image is negative, punitive, and sad.
Dogs do not share this framework.
What we know from canine behavioral science:
- Dogs are facultative den animals — they actively seek small, enclosed spaces for rest and security when those spaces are positively associated
- Research consistently shows that dogs given access to crates in neutral or positive contexts choose to use them voluntarily
- Anxiety in crate-trained dogs is almost always the result of how the crate was introduced, not the crate itself — specifically, rushing the process or using the crate as punishment
The mindset shift that made crate training work for me was this: I am not confining Ollie. I am giving him a room of his own. In a small apartment where the living room, kitchen, bedroom, and office are all essentially the same space, the crate is the one location that is entirely his — with his scent, his bed, his toys, and no competing human activity or stimulation. For a puppy whose nervous system is overwhelmed by the sensory experience of New York City apartment life, that sanctuary is genuinely valuable.
As I laid out in my first time dog owner apartment guide, establishing a safe space is your top priority in the first weeks of bringing a dog home — before training, before socialization schedules, before anything else. Everything builds on the foundation of a dog who has a place to feel secure.
Choosing the Right Crate for Small Spaces
Crate selection matters more in apartment settings than most guides acknowledge, for reasons that include aesthetics, space efficiency, and acoustic properties — all of which are relevant when you’re working with limited square footage and shared walls.
Crate Type Comparison for Apartment Living
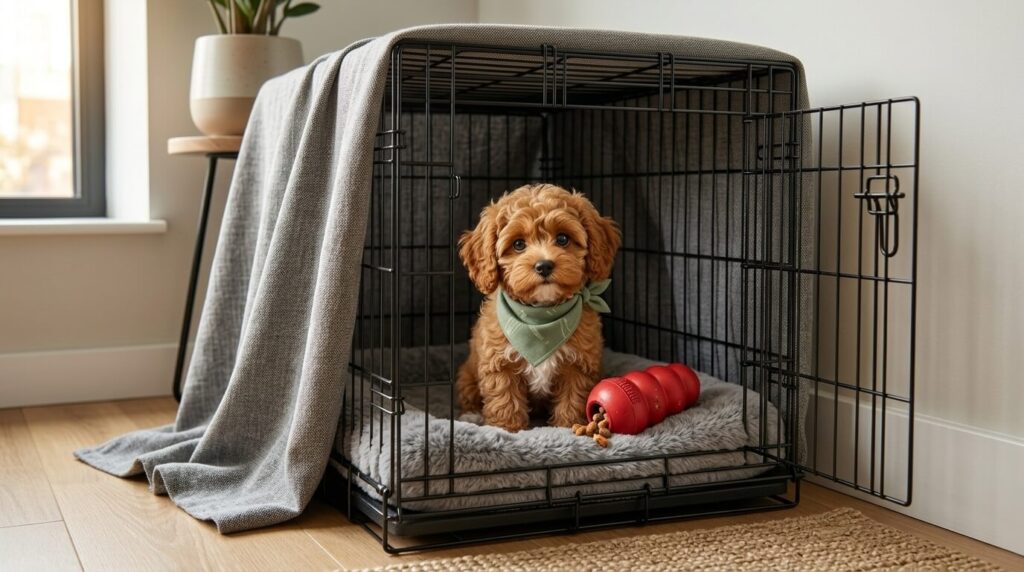
Wire Crates
The most common type and, for apartments, a mixed option. Wire crates offer excellent ventilation and allow your dog to see their environment — which can reduce initial anxiety but also means they can see (and react to) every movement you make, which can delay the settling process.
Apartment considerations:
- Cover three sides and the top with a breathable blanket to create the enclosed den feel that promotes settling
- The open-frame structure does nothing to muffle sound — vocalization travels through freely
- Collapsible for storage in small spaces, which is a meaningful practical advantage
Plastic Travel Crates (Airline-Style)
Enclosed on most sides with ventilation holes, these naturally create a darker, more den-like environment and provide somewhat better sound containment than open wire frames.
Apartment considerations:
- Better initial settling behavior for many dogs due to the enclosed environment
- Less visually intrusive than wire crates but bulkier to store
- Cannot be easily adjusted for size as your puppy grows
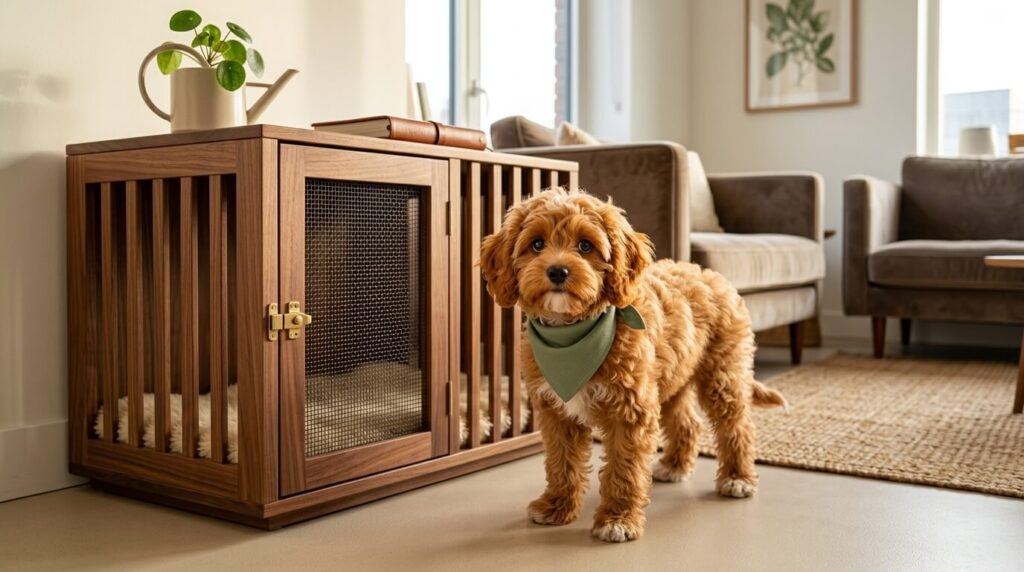
Wooden Furniture-Style Crates
The apartment dog owner’s aesthetic solution — designed to look like an end table or console while functioning as a crate. These offer the best sound dampening of the three options and integrate into apartment décor without visual disruption.
Apartment considerations:
- Significantly more expensive than wire or plastic options
- Excellent sound containment properties
- Limited ventilation in some models — always verify airflow before purchasing
- The option I eventually chose for Ollie, positioned as a functional piece of furniture in the living room
Sizing: The Most Common Mistake
The crate should be large enough for your dog to stand up fully, turn a complete circle, and lie down in a natural stretched position — and no larger.
This feels counterintuitive. Surely more space is better? But excess space defeats the den psychology that makes crates effective. A puppy with too much crate space will simply designate part of it as a bathroom, eliminating the house-training benefit entirely.
For puppies of breeds that will grow, purchase the adult-sized crate with a divider panel — most wire crates include these — and adjust the usable space as your dog grows.
The Neighbor-Friendly Setup (Soundproofing)
This section exists specifically because of the apartment context, and it addresses the practical reality that crate training produces crying — particularly in the first week — and crying in an apartment building with shared walls is a neighbor relations issue that needs to be managed proactively.
Strategic placement within your apartment:
- Avoid walls shared with neighbors during the active vocalization phase of training. Position the crate against an interior wall or in a room that provides maximum distance from shared boundaries.
- Avoid the bedroom during initial training if night crying is a concern — the closer to your sleeping space, the more disruptive to your own sleep, and sleep deprivation makes consistent training harder.
- The bathroom consideration: Some trainers recommend placing the crate in the bathroom initially because the tiled surfaces and contained space both dampen sound and create a naturally enclosed, den-like environment. For small breeds in small apartments, this can be surprisingly effective for the first two to three nights.
The white noise machine — your most important apartment training tool:
A white noise machine positioned outside your apartment’s main door during the early training phase serves two purposes simultaneously: it masks the sound that travels into the hallway, and it provides a consistent auditory environment for your dog that signals “sleep time” and buffers the startling sounds of apartment building activity — elevators, hallway conversations, neighbors’ doors — that can trigger or prolong vocalization.
Additional sound management strategies:
- Position the crate away from external windows to reduce street noise triggering that can delay settling
- Use the breathable blanket covering not just for den-psychology but for sound dampening
- A ticking clock or heartbeat simulation toy placed near (not inside) the crate can reduce anxiety vocalization in puppies who are responding to the loss of their littermate proximity
The proactive neighbor communication strategy:
Within the first few days of bringing your dog home, knock on the doors of your immediate neighbors and briefly explain what you’re doing. “I’m crate training my new puppy — there may be some crying this week as he adjusts, but I’m actively working on it and it should resolve within a week or two.”
This simple conversation does three things: it humanizes you and your dog, it sets accurate expectations rather than allowing neighbors to stew in unaddressed frustration, and it demonstrates the kind of considerate dog ownership that prevents noise complaints from reaching your landlord.
The 7-Step Apartment Training Protocol
This is the exact sequence I used with Ollie. The steps are ordered deliberately — skipping ahead or compressing the timeline is the most common reason crate training fails or produces a dog who tolerates rather than genuinely accepts the crate.
One rule that governs all seven steps: Your dog should never be distressed inside the crate. Mildly confused, yes. Briefly frustrated when you close the door, yes. Actively panicked or in sustained distress, no. If you reach a step and your dog’s response is panic rather than mild protest, return to the previous step and spend more time there.
Step 1: Introduction Without Pressure (Days 1–3)
The crate door stays open. Always. Your only job in this phase is to make the crate the most interesting and positive location in your apartment.
How to execute:
- Place the crate in an area where you spend significant time — the living room is usually ideal
- Put your dog’s softest, most familiar-smelling bedding inside
- Toss high-value treats into the back of the crate periodically throughout the day, let your dog enter to retrieve them, and exit freely without any door interaction
- Eat your own meals near the crate so your scent and presence become associated with the crate environment
- Do not lure your dog in and then close the door. The moment any pressure is applied during this phase, you slow the process down.
What success looks like: Your dog is moving in and out of the crate voluntarily without hesitation by the end of this phase.
Step 2: Feed All Meals Inside the Crate (Days 3–7)
Meals are the highest-value positive experience in most dogs’ daily routine. Consistently placing the food bowl inside the crate — at the back, requiring full entry — builds a powerful positive association faster than any other single intervention.
Progression:
- Days 3–5: Bowl placed just inside the entrance, door open
- Days 5–7: Bowl placed at the back, door open
- Day 7: Bowl at the back, door gently closed while eating, reopened immediately when the meal is finished
That last step — closing the door briefly during a meal and opening it before your dog shows any distress — is the first introduction to door closure in an entirely positive context. Most dogs barely notice it because their attention is entirely on the food.
Step 3: Introduce the Frozen Kong as the Crate Gateway (Week 2)
The frozen Kong becomes the crate entry ticket, and this association — crate entry = Kong appears — is one of the most durable and useful behavioral links you can build.
The protocol:
- Prepare the frozen Kong the night before (always have one ready in the freezer)
- Begin every crate session by producing the Kong from the freezer, placing it inside the crate, and allowing your dog to enter and begin working on it
- Close the door gently once your dog is engaged with the Kong
- Open the door after five minutes, regardless of whether the Kong is finished
The Kong’s frozen state is important. A frozen Kong requires 20–40 minutes of sustained work, which means your dog is occupied and positively engaged for the entire duration of the initial closed-door sessions.
Step 4: Practice Micro-Absences (Week 2)
This is the step that directly addresses the apartment-specific challenge of neighbor noise, because it’s where you begin building duration in closed-door sessions and where any vocalization will begin.
The micro-absence protocol:
- Place your dog in the crate with the frozen Kong
- Close the door
- Move to a different area of the apartment — not leaving, just out of sight
- Return after 30 seconds
- Open the door calmly (no excited greeting that rewards any prior vocalization)
- Repeat, gradually extending the absence: 1 minute, 2 minutes, 5 minutes, 10 minutes
The critical rule: If your dog begins vocalizing before you return, do not return while they are actively vocalizing. Wait for even a two-second pause, then return immediately and calmly. Returning to vocalization — even once — teaches the dog that crying produces your return, which dramatically extends the vocalization phase.
You must know exactly how long can you leave a dog alone in an apartment before utilizing a crate as a confinement tool during absences, because developmental stage and breed significantly affect appropriate duration limits — limits that exist regardless of how well the crate training is progressing.
Step 5: Build to Full Room-Level Absences (Weeks 2–3)
Once your dog is settling reliably for 10–15 minute closed-door sessions with you in an adjacent room, begin adding genuine absence — leaving the apartment for brief periods.
The progression:
- Step outside your apartment door for 30 seconds, return
- Walk to the end of the hallway, return
- Leave the building for 5 minutes, return
- Gradually extend to 15, 30, 60 minutes over the following days
The white noise machine matters most at this stage. Building sounds that your dog would normally react to — hallway activity, elevator sounds, neighbors — are experienced from inside the crate during your absence and can trigger vocalization. The white noise machine buffers these triggers during exactly the period when you’re not there to intervene.
Step 6: Introduce Nighttime Crating (Week 3)
Night crating is often the hardest phase for apartment owners because the silence of nighttime makes any vocalization more audible to neighbors. The approach is specific and differs from daytime training.
For puppies under 16 weeks: The crate should be in or very near your bedroom. Puppies this young need nighttime bathroom breaks and the proximity of their owner’s breathing and movement provides genuine anxiety reduction. A crate placed next to your bed — at mattress height if possible — allows you to trail your hand near the crate door for reassurance during settling without picking the puppy up.
The nighttime protocol:
- Last meal at least two hours before bedtime
- Final bathroom opportunity immediately before crating
- Frozen Kong or appropriate chew item at crate time
- White noise machine on in the room
- No interaction if vocalization occurs after the initial settling — any response, positive or negative, teaches the dog that vocalization produces attention
For adult dogs: The nighttime transition is typically smoother than for puppies. An adult dog who has completed Steps 1 through 5 will usually accept nighttime crating within two to three nights with minimal vocalization.
Step 7: Fade the Training Aids (Week 4 and Beyond)
The goal of crate training is a dog who accepts the crate because it is inherently comfortable and safe — not a dog who only tolerates it when special management tools are present. This final step gradually removes the scaffolding.
Fading order:
- Reduce the frozen Kong frequency — transition from every session to alternate sessions, then to novel or extended absences only
- Reduce treat frequency inside the crate between sessions
- Leave the door open during non-absence periods — this is when you begin observing voluntary crate use, which is the clearest possible signal that the training has genuinely worked
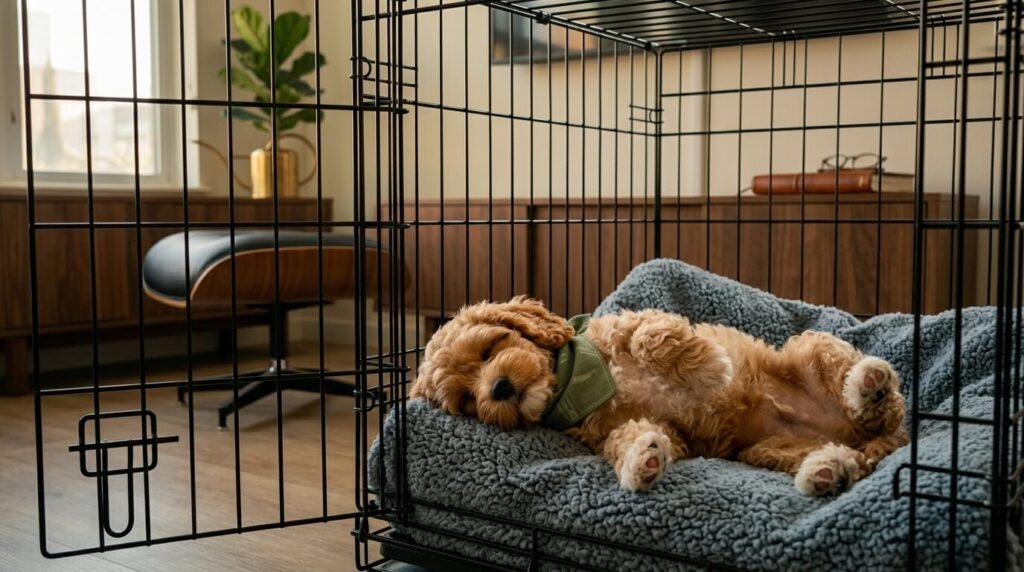
When Ollie started choosing to nap in his open crate without any prompting, it was one of the most satisfying moments of his entire training process. Not because it meant I’d won some behavioral battle — but because it confirmed that the crate had become what I’d hoped it would be: genuinely his space, in every sense.
What NOT To Do
Several commonly circulated approaches to crate training are either ineffective or actively harmful, particularly in the apartment context where the stakes include neighbor relations, your security deposit, and your dog’s genuine welfare.
❌ Using the Crate as Punishment
The moment you place your dog in the crate as a consequence for any behavior, you have fundamentally altered the crate’s emotional valence for your dog. The crate must be a neutral-to-positive space exclusively. A dog who has been crated in anger or frustration will resist future crating, increase vocalization, and may develop anxiety responses that are genuinely difficult to reverse.
❌ Responding to Vocalization
This is the hardest instruction for new owners and the most important one. Any response to crying — going to the crate, speaking to the dog, even making a shushing sound — teaches the dog that vocalization is functionally effective. In an apartment building where that vocalization is what you most need to minimize, the instinct to respond is exactly opposite to what the situation requires.
❌ Forcing the Dog Inside
Physically placing your dog in the crate when they are resisting entry sets back the training significantly and introduces a stress association that will need to be actively overcome. If your dog won’t enter voluntarily, return to Step 1 and spend more time there. The process cannot be hurried without cost.
❌ Leaving a Dog Crated for Excessive Hours
The crate is a management and training tool, not a long-term housing solution. Using it to contain a dog for extended periods during work hours without adequate exercise, bathroom access, and human interaction crosses from management into welfare concern — and creates the frustration and anxiety that makes training much harder.
Panic chewing on wire crate bars is a direct expression of this desperation, and it is genuinely dangerous — panic chewing can break teeth, leading to expensive emergency indoor dog vet visits that could have been entirely prevented with appropriate crate duration limits and midday breaks.
❌ Covering the Crate with Non-Breathable Materials
Covering three sides of a wire crate to simulate a den is excellent practice. Covering it completely with a heavy, non-breathable blanket in a warm apartment creates a ventilation problem that can cause overheating. Always use breathable mesh covers or light cotton blankets, and always leave the front panel uncovered for airflow.
Frequently Asked Questions
Should I let my puppy cry it out in the crate?
The “cry it out” approach — ignoring all vocalization until it stops — can work in the short term in the sense that eventually, most dogs will stop crying from exhaustion or extinction. However, in an apartment building, the neighbor-relations cost of extended vocalization can be significant, and for puppies with high anxiety baselines, sustained crying can actively worsen the anxiety response rather than resolving it.
A better approach is prevention: keep initial sessions short enough that vocalization doesn’t begin, return before distress escalates, and build duration gradually. The goal is a dog who settles quickly because the experience is positive and predictable, not a dog who has learned that crying eventually stops because no one comes.
How long does crate training apartment dogs typically take?
Most healthy adult dogs with no prior negative crate associations can be crate trained to a reliable, comfortable baseline within two to four weeks using the stepped protocol above. Puppies typically take slightly longer — four to six weeks — because their impulse control is developmentally limited and their anxiety baselines are more variable.
The biggest factor affecting timeline is consistency: dogs who go through the protocol with consistent daily practice progress significantly faster than dogs who experience the training only on some days. Rushing the timeline by skipping steps or compressing phases is the most reliable way to extend the total training duration.
What do I do if my dog has a negative association with crates from a prior experience?
Counter-conditioning a negative crate association requires more time and more careful progression than primary crate training, but the approach is essentially the same — you simply start further back and move more slowly.
Begin with the crate in the room but deconstructed (no door, no roof if it’s a wire crate) and spend as long as necessary — days or even weeks — at each step before adding any confinement element. High-value food rewards (chicken, cheese, small pieces of meat) rather than standard kibble or treats accelerate the counter-conditioning process because the emotional valence of the food needs to be strong enough to override the prior negative association.
If the negative association is severe — if your dog shows panic responses like trembling, salivating, or self-injury at the sight of the crate — a veterinary behaviorist consultation is the appropriate first step rather than attempting to work through it independently.
References
- Herron, M. E., Lord, L. K., & Husseini, S. E. (2014). “Effects of petting with and without eye contact on stress responses in shelter dogs.” Journal of Veterinary Behavior, 9(5), 228–234. Referenced for canine stress response frameworks and the behavioral science of positive association building. https://doi.org/10.1016/j.jveb.2014.06.005
- American Veterinary Medical Association (AVMA). (2023). Crate Training Your Dog. AVMA Pet Owner Resources. Available at: https://www.avma.org/resources-tools/pet-owners/petcare/crate-training-your-dog
Ollie is currently asleep in his open crate as I finish writing this — which remains, many months after that first terrible Tuesday night, the most reassuring sight in my apartment. Whatever you’re experiencing right now in week one or two of this process, I genuinely promise it gets there. It just needs time, consistency, and a white noise machine placed directly outside your front door.